• Skip to main content
  • Skip to secondary menu
  • Skip to primary sidebar

Gaynor Marshall | Sewing and Design

Designing Calm, One Stitch at a Time

  • Home
  • Store
  • About
    • Copyright
    • Disclosure Policy
  • Blog
    • The Cottagecore Aesthetic: Understanding What it is and How to Use it
    • Crafting for Wellness
      • Mindful Crafting: Unlock Creativity and Transform Wellbeing
    • Discover the Inventor of the Sewing Machine: A Fascinating History
    • Sewing
      • Spring Sewing Delights: Fresh Projects to Celebrate the Season
      • Sewing Essentials: Setup & Success
        • How to Set Up an Inspiring Sewing Workspace at Home
        • Sewing Tools: My Essential Top Ten
        • Stitch Library – Ultimate Guide
        • Successful Sewing: My 5 Secrets
        • Thread Basics: The Ultimate Beginner’s Guide to Sewing and Embroidery
    • Tutorials
      • Buttons: Make Your Own
      • Creative Ways to Use Machine Embroidery for Stunning Projects
      • Drawstring Bags: Make Your Own
      • Creative Embroidery Templates: Think Outside the Box for Unique Designs
      • Mini Bunting Make Your Own
      • Take Your Sewing to the Next Level
      • Zips
        • Zips, Part 1: Invisible Zip
        • Zips, Part 2: Semi-concealed Zip
        • Zips, Part 3: Concealed Zip
        • Zips, Part 4: Exposed Zip
  • Get In Touch
    • Cookie Policy
    • Privacy Policy
    • Terms & Conditions
Home » Blog

Blog

Creative Embroidery Templates: Think Outside the Box for Unique Designs

January 14, 2018 By Gaynor Marshall

wildlife_friends_finished_projects

I’m sure that like me, you try to get the most out of your creative purchases. We all like added value especially when we work hard for our money. So, when I designed my embroidery templates I was keen to explore other ways to use them. Of course you can use these creative suggestions for any templates that you may already have.

More than just embroidery templates

Alfie, Ethan and Sophie are such cute little characters, I immediately thought they’d look awesome appliqued onto cushions and of course hoop art.

The images can be used as they are but I decided to enlarge them slightly.

all_three_embroidery_templates

The simple shapes of the embroidery templates lend themselves perfectly to the technique of applique and of course they can be further embellished if you wish.

Ethan Whale: easy cushion

ethan_finished_cushion

  • I traced around Ethan onto some Bondaweb and ironed this onto my chosen fabric. For my little panels I used 8″ squares of cotton fabric. You can use any size for your projects though, it’s entirely up to you.
  • I then cut Ethan out and ironed him in place on the white panel.

ethan_template

  • Using some white thread, I machine stitched around the outside of Ethan close to the edge of the fabric. I used the normal foot on the machine and took my time, taking care around his tail. I did this a couple of times. Don’t worry if you wobble a little with your stitching, no one will see.

ethan_close_up_of_tail

  • I used the same fabric on the reverse of the cushion. Simply stitch the front and back panels together, leaving a gap for turning and then stuff with toy stuffing. Hand stitch the seam closed to finish and enjoy! A simple yet effective little, decorative cushion.

ethan_decorative_cushion

Sophie Elephant: bordered cushion

sophie_finished_cushion

  • As with Ethan, I used Bondaweb to applique Sophie onto the white cotton fabric.

sophie_template

  •  I chose a purple mini polkadot fabric for her ear, and I picked out the green in the fabric to stitch the ear close to the edge of the fabric. I also used this colour to stitch around Sophie.

sophie_close-up_ear

  • To make the border, I chose the same fabric I had used for Sophie, and cut 4 strips that were 1.5″ wide and long enough to border the main panel.

sophie_pinned_border

  • Stitch the border strips on the top and bottom first, and press in place using an iron.
  • Do the same on the remaining two sides and trim away any excess.

sophie_border_attached

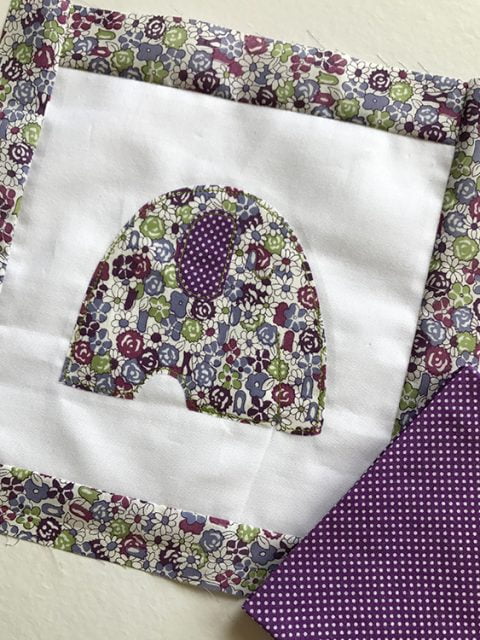
  • I chose to use some of the purple mini polkadot fabric for the reverse. Cut to the same size as the front panel and sew together as before.

sophie_finished_cushion

Alfie Giraffe: appliqued hoop art

alfie_hoop_and_thread

This is the simplest project, but I think it’s still as striking and definitely fun.

  • Follow the steps above to applique Alfie onto the cotton panel.

alfie_template

  • This time I used a gorgeous turquoise thread to outline Alfie, using the same method as above.
  • I placed Alfie in a 6″ hoop, and gathered the excess fabric at the back. A quick and easy piece of original art. Bespoke and personal, a unique way to decorate your home.

alfie_close_up_with_thread

Wildlife Friends

wildlife_friends_finished_projects

I hope you like these projects, and if they inspire you to create your own, why not share them on Instagram using #gaynormdesigns, I’d love to see them.

Until next time…

blog_signature

facebookShare on Facebook
TwitterTweet
FollowFollow us
PinterestSave

Make a dreamcatcher

November 26, 2017 By Gaynor Marshall

dreamcatcher_step_8

Make a dreamcatcher following my simple step by step instructions.

Read about the history of the dreamcatcher and how you can create your own using a few simple items.

Once you have learnt the basics you can be as creative as you wish with the embellishments you have.

Think outside the box, dreamcatchers make great Christmas tree ornaments too.

However you decide to use yours, have fun!

What is a dreamcatcher?

A dreamcatcher is a wooden or metal hoop decorated with a web of cord or sinew and decorated with beads and feathers.

Traditionally, dreamcatchers were hung on the cradleboards of newborns. They were intended to protect them from bad dreams while they slept and to entertain them when they were awake. The bad dreams were caught on the web and evaporated with the first rays of the morning sun. The good dreams passed through the small hole at the centre of the web and into the sleeper below.

Through their consistent oral traditions the Ojibwe have ancient stories about the dreamcatcher, how it “came to be”, why it is used and how it should be made. They are credited with creating the earliest versions.

It is worth noting that the traditional methods of creating dreamcatchers can no longer be followed exactly as Government laws forbid the sale of feathers from sacred birds and the use of deer sinew for the webs, therefore modern alternatives have been sought.

Where should I hang my dreamcatcher?

Modern babies sleep in cots or cribs so they can be hung on the wall above these, or in the case of older children and adults they can be hung over their beds. In this position it can catch any “bad dreams” in its web, and allow “good dreams” to pass through the small central hole and into the sleeper below.

Are the colours of the dreamcatchers significant?

Colour symbolism does play a key role in tribal culture with regard to many things, however, the colours used in most modern dreamcatchers are for decorative purposes only.

What do the feathers represent?

A feather placed in the centre of a new baby’s dreamcatcher represented the breath or air. As it danced in the wind it was a source of entertainment.

The feather of the owl would be used for wisdom (a woman’s feather), and the feather of the eagle would be used for courage (a man’s feather). Their use would not necessarily be restricted by gender, but the user would be aware of the gender properties they were invoking.

Make your own dreamcatcher

Materials:

  • wooden hoop
  • approx. 5m cord
  • selection of beads
  • feathers
  • ribbon
  • glue

Instructions:

(NB: These instructions are for right-handers so left-handers may want to reverse the directions when weaving.)

  1. Take the cord and tie a knot at the top of the hoop.

dreamcatcher_step_one

  1. Begin to weave the first part of the web as shown below. A variety of looks can be achieved by varying the number of points you use to attach the web to the hoop. Some people have specific reasons for the number of points they use. For example, in honour of Spider woman 8 points would be used to represent her 8 legs.
  2. The entire first row should be loosely woven.

dreamcatcher_step_3

  1. Now continue to weave the web attaching it to the thread this time. As you tie these hitches you should begin to pull each stitch in the web snugly, but not tight.

dreamcatcher_step_4

  1. Continue around the web tying a hitch and pulling tighter each row. You may start adding a bead or two along the way, until you are down to a small hole in your web.

dreamcatcher_step_5a

Alternatively, you may just add one bead in the very centre of the web.

dreamcatcher_step_5b

  1. At the point you want to finish your web, tie a double half hitch knot over the middle of the next section. Pull tightly.

dreamcatcher_step_6

  1. Attach feathers and beads to the centre of your dreamcatcher, by threading on the desired selection of beads. Secure using a double knot.

dreamcatcher_step_7a

The feather can now be pushed through the beads and secured with a dab of quick-drying clear glue. Any excess cord or visible quill tip can be trimmed once the glue has dried.

dreamcatcher_step_7b

Additional feathers and beads can be added around the edge of the hoop in a similar way.

dreamcatcher_step_7c

Firstly, take two or three lengths of cord, approximately 30cm each and attach as shown.

dreamcatcher_step_7d

These cords may be attached at the mid-point, lower quarter and/or the bottom point. The choice is yours.

dreamcatcher_step_7e

Thread on the beads and feathers and secure and trim as before.

dreamcatcher_step_7f

The finished length is also a personal choice.

dreamcatcher_step_7g

Thread on the beads and feathers and secure and trim as before.

  1. Take a piece of cord or ribbon approximately 40cm and tie at the top of the hoop. You can now hang up your dreamcatcher.

dreamcatcher_step_8

Always supervise children when crafting. Dreamcatchers are NOT toys.

I hope you have enjoyed this tutorial. If you are inspired to create your own dreamcatcher please feel free to share using #gaynormdesigns over on Instagram.

Until next time…

Gaynor xx

facebookShare on Facebook
TwitterTweet
FollowFollow us
PinterestSave

Sewing Tools: My Essential Top Ten

November 19, 2017 By Gaynor Marshall

sewing_machine

There are a bewildering array of sewing tools available for today’s sewers. Today I want to share with you my choice of what I consider to be the essential sewing ones. I don’t mean the latest trendy gadgets, I mean the basic, tried and tested can’t do without tools of the trade.

Sewing Tools of the Trade

sewing_tools

Sewing Machine

If you are considering purchasing a machine for the first time, consider carefully what you actually want to be able to sew. Chances are you won’t need an all singing all dancing quilting or embroidery machine if you are just starting out.  

I would suggest that you don’t buy a very basic machine because you will find you outgrow it rather quickly.

For most soft furnishing or dress making projects a mid-range machine, either computerised or mechanical will be suitable.

Most sewing shops encourage you to try before you buy, to make sure you find the right machine for you, so pop along to your nearest showroom and have a play. Ask lots of questions and think about what you really want to use your machine for.

Scissors

You should try to purchase the best scissors you can afford. If you are left handed buy left handed scissors. Some scissors can be held in either hand, but left handed scissors have the blades the opposite way round making it easier to see what you are cutting.

The most important thing to remember about your fabric scissors, is only ever cut fabric with them. Cutting paper will blunt them and even if you sharpen them, they will never be the same again.

Pins

My preference are glass headed pins. Whatever type of sewing you do, you can be sure there will be lots of ironing involved and glass headed pins will not melt if you accidentally iron them.

Cutting Mat

These are a very useful addition to your craft room, as they protect your work surface from damage and are an absolute necessity if you use a rotary cutter.

They come in various sizes and are generally double sided; metric on one side and imperial on the other.

Originally they were all green but now they come in lots of lovely colours if you shop around.

Seam Ripper

This unassuming little tool is invaluable. It makes unpicking stitches a quick and easy task.

It can also be used to gently feed fabric underneath the presser foot and is extremely good for carefully opening buttonholes.

Rulers

Depending on the job in hand, there are a number of options.

For large projects like curtain making, a steel metre ruler is the best option, it gives a true straight line and its large size makes measuring long lengths easier.

Plastic rulers specifically designed for patchwork and quilting make measuring and cutting easy. I would suggest a 6″ square and a 6″ x 24″ oblong ruler as a starting point.

For measuring seams and hems little hem guides are an amazing invention.

Rotary Cutter

These come in a number of sizes and are ideal for patchwork and quilting.

They must always be used in conjunction with a cutting mat and with due care and attention. The blade should always be covered or retracted before the rotary cutter is put down, this helps to avoid accidentally cutting yourself on an open blade.

Always cut away from yourself and keep fingers out of the way. Only use patchwork and quilting rulers with a rotary cutter as ordinary rulers are not made to withstand their use.

Pincushion

You will definitely need a safe place to keep all of your pins. A pincushion is very practical because you can pick them up easily whenever you need them.

Making your own is also a great use for your scrap fabric. They can be as fancy as you like, take a look on Pinterest for inspiration.

Thread

After spending time, energy and love creating your projects you want them to last. Using good quality thread means seams and finishes are more likely to stand up to everyday life.

Check out my post on choosing the correct thread for your project here.

Steam Iron

As I mentioned before, sewing actually involves a lot of ironing but this doesn’t mean you have to buy a really expensive iron. When I upgrade my everyday iron at home, I put the old one in my sewing room.

Although, you may not use much steam for quilting and patchwork, it’s always handy to have the option for other projects.

I hope you find this list useful. If you have any comments or questions I’d love to hear from you.

If someone you know would find this list helpful, please feel free to share.

Until next time…

Gaynor xx

facebookShare on Facebook
TwitterTweet
FollowFollow us
PinterestSave

Creative Ways to Use Machine Embroidery for Stunning Projects

November 5, 2017 By Gaynor Marshall

pink_hoop_art_4

Design your own fabric using decorative machine embroidery!

I’m sure you’ll agree, beautiful fabric is one of lifes’ necessities…erm…ok…luxuries; the colour, the texture, the feelings it can evoke, the endless creative possibilities. You’ll also be aware of how expensive good quality fabric can be. I’m not trying to talk myself out of my surface design job, but I want to share a quick and easy way to create gorgeous, unique fabric using only plain fabric and thread.

Decorative Machine Embroidery.

Your sewing machine is a fabulous tool. A very, under-used tool. Most of the time, the only stitch we use is the straight stitch; much needed and very necessary when sewing seams, but not the only one available.

Even if you have an entry level sewing machine, it will have a good handful of utility and decorative machine embroidery stitches. Have a look. If you create a stitch library you will be able to see at a glance the array of stitches available to you.

I have designed a number of projects suitable for using any of the stitches you have on your machine. Use them to create home decor items, either for yourself or to give to a loved one or friend.

 Projects.

1. Pincushion

The first project I want to share is a pincushion. Very simple to put together but very stylish and no one anywhere will have one the same style.

turquoise_pin_cushion_1

  • I wanted to create a 6″ (15cm) finished pincusion. I cut 2 squares of main fabric and two squares of lining measuring 6.5″ x 6.5″ ( 16cm x 16cm approx.). You don’t have to use lining fabric you could use stabiliser, thin wadding or anything you have to hand for the inside.

fabric_pieces

  • Using two contrasting colours makes a bigger impact.
  • For the turquoise side I used a bright pink thread and for the green side I used a turquoise thread. I find the best thing to do is to draw a straight line with an air erasable pen so that your first row of stitches is straight. It doesn’t matter whether you start at the edge of your fabric or the centre, I prefer to start in the centre and then space the rows evenly either side.

stitches_on_machine

  • You may choose to sew a random selection of decorative embroidery stitches, or you could mirror them to create a further interesting design feature.
  • Once both your fabric pieces are complete, place them right sides together and sew them together using a straight stitch, remembering to leave a small gap for turning.

decorative_stitches_right_sides_together

turn_out

neaten_seams

  • When you have turned the pincushion out and you are happy with the corners, stuff it firmly with toy or craft stuffing. The trick when stuffing anything is to use small pieces until it is firm and evenly filled.
  • Hand sew the gap using a ladder stitch.

stuff_pin_cushion

embroidered_turquoise_pincushion

  • I also rotated the fabric pieces, so that on one side the stitches ran top to bottom and on the reverse they are side to side. Another design feature for a totally bespoke pincushion.

2. Scissor Keeper

The instructions for making scissor keepers is almost identical to those for a pincushion. The only difference, apart from size, is you need to add a piece of ribbon or cord before you stitch the two pieces together.

For reference my scissor keepers measure 2″ x 2″ and 3″ x 2.5″ finished sizes (5cm x 5cm & 7.5cm x 6cm approx). Add 1/4″ (1cm) for the seam allowances.

materials_for_scissor_keeper

scissor_keeper_adding_ribbon

  • Carefully tack / baste the ribbon in place before stitching the outer pieces together.

stuff_scissor_keeper

These handy little notions can be made in a variety of sizes for different scissors and can even be used as keyrings.

turquoise_scissor_keeper

scissor_keepers

pink_scissor_keeper

3. Hoop Art.

Use fabric in an embroidery hoop as a modern style of wall art.

These clever little inventions lend themselves perfectly to home decor. Arrange them in groups of varying sizes to add interest to a plain wall.

  • To crate your own hoop art, choose the hoop size you wish to use and stitch your fabric. Make sure the piece of fabric you use is big enough to fit inside the hoop.
  • Trim the fabric piece by using the inner hoop as a template and fix onto the frame.

pink_hoop_art

Display proudly on your wall!

4. Wall Art.

Another idea is to stitch a panel of fabric using decorative machine embroidery stitches and display in a box frame. I created a simple design by using one stitch in the centre of the panel and then I mirrored the outer stitches to form a balanced design.

embroidery_black_frame

embroidery_black_frame_1

embroidery_white_frame_1

Use more than one colour and see the different effects you can achieve. A rainbow of colours would look stunning.

I hope you enjoy creating your own fabric using the decorative machine stitches on your sewing machine. Feel free to share photos of your makes using #gaynormdesigns over on Instagram, I’d love to see them.

Until next time…

Gaynor xx

facebookShare on Facebook
TwitterTweet
FollowFollow us
PinterestSave

Successful Sewing: My 5 Secrets

October 29, 2017 By Gaynor Marshall

pincushion_in_pins_fabric

The Secrets to Successful Sewing

I have 5 secrets to successful sewing and they will probably surprise you.

Sewing is a skill that we have to learn and not something we are born with.

Sometimes people refuse to learn anything new because they may feel vulnerable, but that’s how we grow. Staying inside our comfort zones is safe but it also means that we never experience anything new.

Read on to discover my 5 secrets to being successful, not just at sewing but anything creative.

1. Remember You Are Awesome.

Surprisingly, being successful at something creative, whether that’s sewing, baking, painting, knitting or something else, isn’t simply about having the latest, most expensive equipment or the largest studio in the most fashionable part of town. It’s much more fundamental than that.

It’s about YOU!

You are the one who has to put in the time and effort into your chosen field of study and practise. Again and again.

2. Practise Makes Perfect.

You don’t have to make complete projects every time you sew, just allow yourself time to play and experiment.

Make use of that basket of scraps, experiment with the stitches on your machine, treat yourself to a few new spools of thread. Check out my beginners guide to thread here.

embroidered_turquoise_pincushion

jewel_coloured_threads

I’ve seen so many people panic about creating something because they’ve never attempted a particular project before. However, if you are used to handling different fabrics and sewing notions, it becomes much easier to learn a new technique.

Successful sewing really is about building your confidence.

I’m not saying that by playing we’ll all suddenly become experts in everything, far from it. What I am saying is, if you familiarise yourself with the various aspects of your craft, you broaden your experience and expand your skillset.

For example, if you practise inserting zips, the next time you have to insert a zip into a cushion or a piece of clothing, you will at least have an understanding of the process. You will be familiar with it and it won’t be so scary. Use small scraps of fabric and keep them for future reference.

zip_sample

3. Handmade Not Homemade.

My mission is to encourage people to take up sewing and embrace all that that entails. To have a go, have fun and learn new skills. Join a sewing group in your area and make new friends.

Everyone makes mistakes, it’s part of the learning process. Your unpicker will become one of your best friends, believe me, I speak from experience! But, on the other hand, wobbly seams and uneven hems are not the end of the world and the next time you tackle them they will be much better.

However, I am not about cutting corners and making do.

It saddens me when I hear people say things like “life’s too short to hand close a seam”. Really? You would rather finish a beautiful bag by machine stitching the lining closed because it may take a couple of minutes to hand sew it with an invisible ladder stitch?

simple_ladder_stitch

In my opinion, if you are going to learn how to do something, you should at least learn how to do the basics properly.

4. Learning Resources.

I mentioned joining a local sewing group, but there are lots of options for you to consider when starting your successful sewing journey.

There are plenty of free videos and tutorials around, but be selective. Not all of the contributors are qualified or experienced, so my advice is to take recommendations or at the very least follow someone reputable.

Workshops are a wonderful place to start and can be less expensive and less time consuming than committing to a course of lessons. Being with a tutor is sometimes a better way to learn new techniques, especially if you are a kinaesthetic or hands on type of learner.

Sewing groups on social media can be a good source of information and support, again make sure they can offer what you need.

Last but not least, invest in a book or two.

5. Have Fun.

The main thing to remember on your journey to successful sewing, is to have fun.

Don’t be afraid of making mistakes, we all make them. The trick is to learn from them so that we don’t knowingly repeat them.

Enjoy the process and be proud of the things you make.

If you’d like to share photos of your creations, you can share them over on Instagram using #gaynormdesigns. I’d love to see them.

Until next time…

Gaynor xx

facebookShare on Facebook
TwitterTweet
FollowFollow us
PinterestSave
« Previous Page
Next Page »

Primary Sidebar

Printable Downloads

Search

Join My Substack

Copyright © 2017-2026 Gaynor Marshall

We are using cookies to give you the best experience on our website.

You can find out more about which cookies we are using or switch them off in .

Gaynor Marshall | Sewing and Design
Powered by  GDPR Cookie Compliance
Privacy Overview

This website uses cookies so that we can provide you with the best user experience possible. Cookie information is stored in your browser and performs functions such as recognising you when you return to our website and helping our team to understand which sections of the website you find most interesting and useful.

Strictly Necessary Cookies

Strictly Necessary Cookie should be enabled at all times so that we can save your preferences for cookie settings.

Cookie Policy

More information about our Cookie Policy