• Skip to main content
  • Skip to secondary menu
  • Skip to primary sidebar

Gaynor Marshall | Sewing and Design

Designing Calm, One Stitch at a Time

  • Home
  • Store
  • About
    • Copyright
    • Disclosure Policy
  • Blog
    • The Cottagecore Aesthetic: Understanding What it is and How to Use it
    • Crafting for Wellness
      • Mindful Crafting: Unlock Creativity and Transform Wellbeing
    • Discover the Inventor of the Sewing Machine: A Fascinating History
    • Sewing
      • Spring Sewing Delights: Fresh Projects to Celebrate the Season
      • Sewing Essentials: Setup & Success
        • How to Set Up an Inspiring Sewing Workspace at Home
        • Sewing Tools: My Essential Top Ten
        • Stitch Library – Ultimate Guide
        • Successful Sewing: My 5 Secrets
        • Thread Basics: The Ultimate Beginner’s Guide to Sewing and Embroidery
    • Tutorials
      • Buttons: Make Your Own
      • Creative Ways to Use Machine Embroidery for Stunning Projects
      • Drawstring Bags: Make Your Own
      • Creative Embroidery Templates: Think Outside the Box for Unique Designs
      • Mini Bunting Make Your Own
      • Take Your Sewing to the Next Level
      • Zips
        • Zips, Part 1: Invisible Zip
        • Zips, Part 2: Semi-concealed Zip
        • Zips, Part 3: Concealed Zip
        • Zips, Part 4: Exposed Zip
  • Get In Touch
    • Cookie Policy
    • Privacy Policy
    • Terms & Conditions
Home » Zips, Part 3: Concealed Zip

Zips, Part 3: Concealed Zip

February 4, 2018 By Gaynor Marshall

Welcome to Part 3 of my series showing you how to insert various types of zips into your sewing projects.

This week we’ll be tackling concealed zips.

What is a concealed zip?

With this method one fold of the fabric covers the zip entirely.

concealed_zip

  • useful for cushions where you do not wish the zip to be visible
  • to allow pattern matching for a seamless look
  • to protect delicate fabrics from being caught on the zip pull / slider
  • jeans / trousers

As before, a standard zipper foot should be used if you are sewing with a machine.

Did you know?

YKK are the largest manufacturer of zips in the world with over 40% of the market share. Each year they produce enough zips to wrap around the world 50 times!

Materials

  • fabric
  • thread
  • zip
  • zipper foot

Method

  • Cut your fabric pieces to the correct size and place right sides together.
  • Position the zip on to your fabric and mark a point at the base of the zip.
  • Machine stitch the seam from the bottom to the base of the zip position.

machine_stitch_to_base_of_zip

  • Decide which side of the seam you want to cover the zip and press a continuation of the seam line in that side only and tack.

press_fold_in_seam

tack_fold_in_top_seam

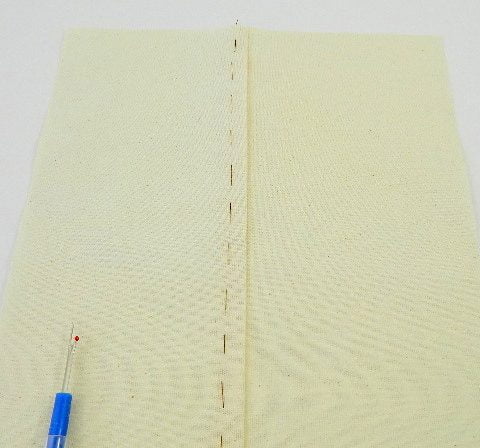
  • On the other side turn under the seam allowance 3mm / 1/8″ from the seam line, making the seam allowance smaller. Tack along the seam line.

tacking_in_top-seam

  • Place the zip right side up and lay the second (smaller) fold against the teeth of the closed zip. Tack in place.

tack_zip_as_shown

  • Starting at the bottom, machine stitch along the length of the zip close to the fold of the fabric.

stitch_zip_as_shown

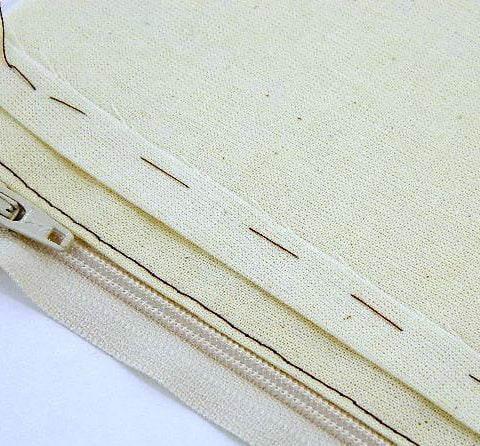
  • Bring the wider fold over the teeth until it meets the original seam line of the first piece of fabric. Tack zip in place.
  • Tack the fold of the fabric that covers the zip in place on the right side of the fabric.

tack_the_fold_to_the_zip

  • Machine stitch in place starting from the bottom.
  • Press carefully and remove tacking stitches.
  • Snip the seam allowance at the base of the zip to allow it to lie flat and hand stitch raw edges to prevent fraying.

machine_in_place_and_remove-tacking

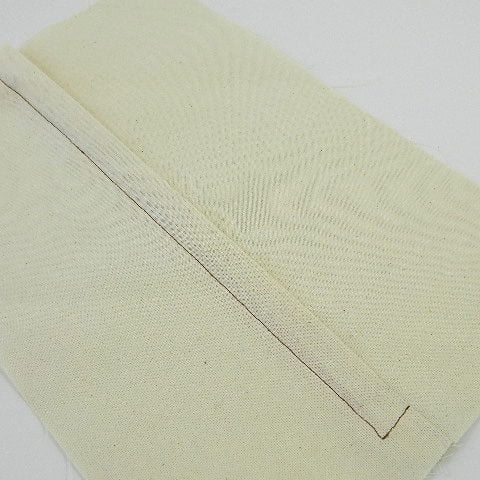
The zip is completely hidden using this method and it gives a very neat finish.

Catch up

If you’d like to catch up on the series so far you can find the relevant information here. Part 1, is about invisible zips and Part 2 is about semi-concealed zips.

I hope you are finding these guides useful and if you have any questions please feel free to get in touch. Pop a comment below or send me an email here.

Next time: exposed zips.

Until then…happy sewing!

blog_signature

facebookShare on Facebook
TwitterTweet
FollowFollow us
PinterestSave

Filed Under: Sewing, Sewing Tips for Trouble Free Sewing, Tutorials, Zips Tagged With: concealed zip, concealed zipper, guidance, help, sewing, sewing lesson, sewing tutorial, zippers, zips

Reader Interactions

Comments

  1. erin says

    February 7, 2018 at 2:57 am

    This zipper technique is actually called a “lapped zipper” and is known through out the industry as this.

    • Gaynor Marshall says

      February 7, 2018 at 8:08 am

      Thank you for reading my post and taking the time to comment.
      Here in the UK, this type of zip insertion is known as concealed. A different name for the same technique.

Primary Sidebar

Printable Downloads

Search

Join My Substack

Copyright © 2017-2026 Gaynor Marshall

We are using cookies to give you the best experience on our website.

You can find out more about which cookies we are using or switch them off in .

Gaynor Marshall | Sewing and Design
Powered by  GDPR Cookie Compliance
Privacy Overview

This website uses cookies so that we can provide you with the best user experience possible. Cookie information is stored in your browser and performs functions such as recognising you when you return to our website and helping our team to understand which sections of the website you find most interesting and useful.

Strictly Necessary Cookies

Strictly Necessary Cookie should be enabled at all times so that we can save your preferences for cookie settings.

Cookie Policy

More information about our Cookie Policy